This post contains affiliate links. Please see our disclosure policy.
Quick Summary
In This Recipe
As an Amazon Associate, I earn from qualifying purchases. This post may contain affiliate links. See my full disclosure policy. Chicken Wing Brine (The Restaurant Technique) If you've ever wondered why restaurant wings are so...
Category: Chicken Recipes, Comfort Food Classics, Game Day | By: Matt Price, Mr. Make It Happen
As an Amazon Associate, I earn from qualifying purchases. This post may contain affiliate links. See my full disclosure policy.
Chicken Wing Brine (The Restaurant Technique)
If you've ever wondered why restaurant wings are so much juicier and more flavorful than what you make at home, the answer is almost always the same — they brine their wings. Brining is one of those restaurant techniques that sounds fancy but is actually dead simple, and it's the single biggest upgrade you can make to your chicken wings. Whether you're frying, baking, grilling, or smoking, a properly brined wing holds more moisture, seasons the meat all the way through, and — here's the part most people don't realize — produces crispier skin.
At Fraîche, we never skip this step on our wings. It's non-negotiable. The difference between a brined wing and an unbrined wing is night and day — one is juicy, flavorful, and snappy with every bite. The other is dry, bland, and forgettable. I'm going to walk you through both wet brine and dry brine techniques so you can pick the one that works best for your setup and timeline. This is the ultimate chicken wing brine recipe, and once you try it, you'll never go back. I've tested both methods hundreds of times in the restaurant kitchen, and I'm sharing everything I've learned so you can get perfect results at home. Let's dive in!

What Is a Chicken Wing Brine?
A brine is a salt-based solution or seasoning method that seasons meat from the inside out while helping it retain moisture during cooking. For chicken wings, there are two main approaches: wet brine (submerging wings in salted water with aromatics) and dry brine (rubbing wings with salt and letting them sit uncovered in the fridge). Both work on the same principle — salt penetrates the meat, breaks down proteins, and allows the muscle fibers to hold onto more water. The result is wings that are juicier, more tender, and seasoned throughout, not just on the surface. The real game-changer is the skin — brining draws moisture to the surface, which then evaporates during cooking, giving you that shatteringly crispy skin that everyone fights over.
Wet Brine Recipe & Technique
This is the classic approach and the one I recommend if you're brining for the first time. It's foolproof and produces incredibly juicy results in just 2-4 hours.
Wet Brine Ingredients
- 4 cups cold water
- ¼ cup kosher salt (Diamond Crystal — if using Morton, use 2 tablespoons)
- 2 tablespoons brown sugar
- 2 bay leaves
- 1 tablespoon whole black peppercorns
- 4 cloves garlic, smashed
- 2 lbs chicken wings

Wet Brine Method
Dissolve the kosher salt and brown sugar in the water — you can warm up half the water to help them dissolve, then add the rest as cold water. Add the bay leaves, peppercorns, and smashed garlic. Place your wings in a large brining container or zip-lock bag and pour the brine over them. Make sure every wing is fully submerged. Refrigerate for 2-4 hours — that's the sweet spot. Under 2 hours and the salt hasn't penetrated deep enough. Over 6-8 hours and the wings start getting too salty. I personally do 3 hours for the perfect balance. The brown sugar in the brine isn't about sweetness — it balances the salt, promotes better browning, and gives the skin a slightly deeper color when cooked. Don't skip it.
After brining, pull the wings out, rinse them briefly under cold water, and — this is critical — pat them completely dry with paper towels. Set them on a wire cooling rack over a baking sheet and let them air-dry in the fridge for at least 30 minutes. Dry skin = crispy skin. Wet skin = steamed, soggy skin. Don't skip this step.


Dry Brine Recipe & Technique
Dry brining is my preferred method when I want the crispiest possible skin. There's no liquid involved — you're just using salt and time. It's also more convenient because there's no messy container of salt water taking up fridge space.
Dry Brine Ingredients
- 2 lbs chicken wings
- 1 tablespoon kosher salt per pound of wings
- ½ teaspoon baking powder per pound (optional — extra crispy skin)
- ½ teaspoon garlic powder
- ½ teaspoon smoked paprika
Dry Brine Method
Use a digital kitchen scale to weigh your wings if you want precision — 1 tablespoon of kosher salt per pound is the ratio. Mix the salt with the baking powder, garlic powder, and paprika. Toss the wings in the mixture until evenly coated. Spread them out on a wire rack set over a baking sheet — don't stack them, give each wing some space. Place the whole setup in the fridge uncovered for anywhere from 1 to 24 hours.
Here's why dry brining produces crispier skin: the salt draws moisture out of the skin initially, then the dry fridge air evaporates that moisture. When you cook the wings, the drier surface crisps up faster and more aggressively. The baking powder raises the skin's pH, which helps it brown more efficiently. After 4+ hours of dry brining, the salt has fully penetrated the meat and the skin is noticeably drier to the touch. Trust me on this one — try it once and you'll see the difference immediately.

Wet vs Dry Brine: Which Is Better?
Both methods produce better wings than no brine at all — that's the most important point. But they each have strengths depending on what you're going for.
For maximum juiciness: Wet brine wins. The wings absorb extra water along with the salt, so they're noticeably plumper and juicier after cooking. This is the move for grilled or smoked wings where you want moisture insurance against the dry heat.
For crispiest skin: Dry brine wins. The drier surface produces a crunchier, more shattering skin, especially when frying. This is my go-to for fried wings and baked wings where crispy skin is the priority.
For flavor penetration: Roughly equal, but dry brine with added spices gives you a slightly more concentrated flavor on the surface. Wet brine seasons more evenly throughout the meat.
For convenience: Dry brine, hands down. No giant container of salt water in your fridge, no rinsing step, no mess. Just season and wait.

Common Brine Mistakes to Avoid
Over-brining. This is the number one mistake. Wet brine for more than 8-12 hours and your wings will be inedibly salty. Stick to 2-4 hours for wet brine. Dry brine is more forgiving — you can go up to 24 hours without issue because there's less total salt involved.
Using the wrong salt. Table salt, kosher salt, and sea salt are NOT interchangeable by volume. Table salt is much finer and denser — if a recipe calls for ¼ cup kosher salt and you use ¼ cup table salt, your wings will be way too salty. Always use kosher salt for brining. Diamond Crystal and Morton are the two main brands, and Morton is about twice as salty by volume as Diamond Crystal. When in doubt, use a kitchen scale and measure by weight.
Skipping the pat-dry step. After wet brining, you have to dry those wings thoroughly. I mean really dry — use multiple paper towels and get every surface. Then let them air-dry on a rack in the fridge. If you throw wet wings into hot oil, they'll splatter dangerously and the skin will never crisp up. This step is non-negotiable.

After the Brine: Cooking Methods
Once your wings are brined and dried, you've got options. Fried is the classic — 375°F oil for 8-10 minutes until golden and crispy. This is the method we use at Fraîche and it produces the best results, period. Baked at 425°F on a wire rack for 40-45 minutes, flipping halfway, gives you great results with less mess. Grilled over indirect heat for 25-30 minutes with a final sear over direct flame gets you smoky char. Smoked at 225°F for about 2 hours then flash-fried for 2 minutes is the ultimate combo — smoky, juicy, and crispy. Whatever method you choose, brined wings will outperform unbrined wings every single time. My personal favorite? The fry method with dry-brined wings. You get maximum crunch on the outside, maximum juice on the inside, and flavor in every single bite. That's the combo we run at Fraîche and people lose their minds over it.


If you're looking for more cooking techniques and recipes, check out our meatloaf recipe for another dish where proper technique makes all the difference. You can also browse all recipes for more dinner ideas. Whether you go wet brine or dry brine, fried or baked — the key is just doing it. The extra step takes minimal effort and the payoff is massive.

Frequently Asked Questions
Are you supposed to brine chicken wings?
Not required, but highly recommended. The difference is noticeable in both juiciness and flavor. Unbrined wings rely entirely on surface seasoning, which means the inside of the meat is bland. Brined wings are seasoned all the way through and retain more moisture during cooking. Once you try it, you'll notice the upgrade immediately — it's a small extra step that makes a massive difference.
Is 2 hours enough to brine wings?
Yes — 2 hours is the minimum sweet spot for a wet brine. The salt needs time to penetrate past the surface and into the meat. Two hours gets you solid results, 3-4 hours is the ideal range, and anything over 8 hours starts making the wings too salty. For dry brine, even 1 hour makes a difference, but 4-12 hours is where you see the biggest gains in skin crispiness.
What should I soak my chicken wings in?
A simple salt water solution is the foundation — ¼ cup kosher salt dissolved in 4 cups of cold water. From there, you can add aromatics like bay leaves, whole peppercorns, smashed garlic cloves, and a couple tablespoons of brown sugar for balance. The sugar doesn't make the wings sweet — it just rounds out the saltiness and helps with browning. Keep the brine cold and make sure the wings are fully submerged.
Can you brine wings too long?
Absolutely. Over-brining is a real thing and it'll ruin your wings. For wet brine, don't go past 12 hours max — the meat absorbs too much salt and the texture starts getting mushy. The 2-4 hour range is ideal. Dry brine is more forgiving since there's less total salt, but I still wouldn't go past 24 hours. When in doubt, taste a small piece after cooking — if it's too salty, reduce your brine time next round.
Now you can Make It Happen at home! Tag me @_mrmakeithappen_ when you make these and show me that crispy skin. Level up your cooking with my signature AP Seasoning, Cajun Seasoning, and more. Enjoy!
For another take, check out my Vodka Chicken Marinade Recipe.
Love this recipe? You'll love my seasonings even more!
Level up your cooking with my signature AP Seasoning, Cajun Seasoning, and more.
Shop My SeasoningsMake It Happen in Your Kitchen
Level up every recipe with my signature seasonings, cookware & bundles.
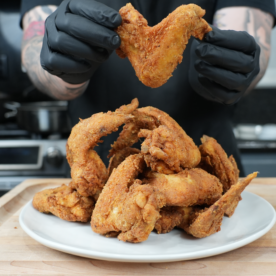
Crispy Brined Fried Chicken Wings
Ingredients
For the Brine:
- 4 cups water
- ¼ cup sugar
- ¼ cup salt
- 1 teaspoon black peppercorns or freshly cracked black pepper
- 2 sprigs fresh rosemary
- 2-3 sprigs fresh thyme
- 3-4 cloves garlic smashed
For the Wings:
- 10-12 units chicken wings drumettes or flats, or a combination of both
- 2 tablespoon mustard yellow or Dijon
- 2 tablespoon hot sauce choose your favorite brand
- 1 tablespoon all-purpose seasoning garlic powder, onion powder, paprika, etc.
- 2 cups seasoned flour for coating
- * Oil for frying vegetable or peanut oil works best
Instructions
Prepare the Brine:
- In a medium-sized pot, combine the water, sugar, salt, black peppercorns, rosemary, thyme, and smashed garlic cloves.
- Heat the mixture over medium heat, stirring occasionally until the sugar and salt have dissolved completely.
- Once dissolved, remove the pot from the heat and let the brine cool to room temperature.
- If you’re short on time, you can place the pot in the fridge or freezer to speed up the cooling process.
- The brine should be cool before you add the chicken wings.
Brine the Chicken Wings:
- Once the brine is cooled, place the chicken wings in a large bowl or a resealable plastic bag.
- Pour the cooled brine over the wings, making sure they're completely submerged.
- If you're using a bowl, you can cover it with plastic wrap.
- Let the wings brine in the refrigerator for at least 2 hours, but for the best results, brine them overnight. This allows the flavors to fully infuse and the wings to soak up the moisture.
- Pouring the brine over ice will cool the liquid faster AND add more volume once the ice melts.
- Use a strainer to ensure you’re only getting the brine solution.
Prep the Wings for Frying:
- When you're ready to fry, remove the wings from the brine and pat them dry with paper towels. You want to remove any excess liquid to ensure a crispy crust when frying.
- In a small bowl, combine the mustard, hot sauce, and your favorite all-purpose seasoning.
- Toss the wings in this mixture, making sure they're evenly coated.
- This step not only adds flavor but also helps the flour adhere to the wings, giving them that extra crispy texture.
Coat the Wings:
- Place the seasoned flour in a shallow dish or large zip-top bag.
- Working in batches, dredge the wings in the flour, making sure each wing is fully coated.
- For an extra-crunchy coating, you can dip the wings back into the hot sauce-mustard mixture and coat them with flour a second time.
Fry the Wings:
- Heat about 2 inches of oil in a deep skillet, Dutch oven, or deep fryer to 350°F (175°C).
- To test if the oil is ready, drop a small piece of bread or a pinch of flour into the oil—if it sizzles immediately, the oil is hot enough.
- Carefully add the wings to the hot oil, being sure not to overcrowd the pan (frying in batches is key).
- Fry the wings for 8-10 minutes or until they're golden brown and crispy on the outside and cooked through on the inside.
- You can check for doneness by using a meat thermometer— the internal temperature of the wings should reach 165°F (74°C).
Drain and Serve:
- Once fried, transfer the wings to a plate lined with paper towels to drain any excess oil.
- While the wings are still hot, feel free to drizzle a bit more hot sauce or toss them in a bowl of your favorite wing sauce for extra flavor.
- Garnish with a sprinkle of fresh herbs or serve with your favorite dipping sauces like ranch or blue cheese.
Notes
- Don’t Overcrowd the Pan: Fry your wings in batches to avoid lowering the oil temperature. This ensures that the wings stay crispy and cook evenly.
- Double Dipping for Extra Crunch: For extra crispy wings, dip the seasoned wings in the flour, then back in the hot sauce-mustard mixture, and coat them in flour again before frying.
- Rest After Frying: Let your wings rest for a few minutes after frying to let the juices redistribute and keep them tender.
- Customize Your Hot Sauce: If you like your wings extra spicy, feel free to add more hot sauce to the mustard mixture or toss the wings in your favorite wing sauce after frying.