
Ribs in the Oven Recipe (Fall-Off-the-Bone BBQ in 5 Easy Steps)
Oct 07, 2024, Updated Mar 26, 2026
This post contains affiliate links. Please see our disclosure policy.
Quick Summary
In This Recipe
- The Ultimate Guide to Ribs in the Oven
- Quick Guide:
- Step 1: Prepare the Ribs
- Step 2: Bake Low & Slow
- Step 3: Wrap & Tenderize
- Step 4: Make the BBQ Sauce
- Step 5: Glaze & Caramelize
- Why You'll Love These Oven-Baked BBQ Ribs
- Step 6: Rest, Slice & Serve
- What to Serve with Oven-Baked Ribs
- Print & Download Oven Baked BBQ Ribs
- Frequently Asked Questions
Make It Happen in Your Kitchen
Level up every recipe with my signature seasonings, cookware & bundles.
How to Make Juicy, Smoky, and Saucy BBQ Ribs in the Oven! by Mr. Make It Happen The Ultimate Guide to Ribs in the Oven Introduction Before I ever had a restaurant kitchen to work...
Category: BBQ & Grilling, Beef Recipes | By: Matt Price, Mr. Make It Happen
How to Make Juicy, Smoky, and Saucy BBQ Ribs in the Oven! by Mr. Make It Happen

The Ultimate Guide to Ribs in the Oven
Introduction
Before I ever had a restaurant kitchen to work in, I was perfecting ribs in the oven at home — and honestly, the technique I developed back then is still what I use today. You don’t need a smoker or a grill to get that fall-off-the-bone tenderness and rich, smoky flavor. With the right seasoning, a low-and-slow bake, and a sticky glaze finish, oven-baked ribs can rival anything coming off a pit. This is the exact method I’ve taught to millions of home cooks on my channel, and it works every single time.
In this post, you’ll learn how to make juicy, flavorful ribs in the oven, plus essential BBQ tips to ensure your ribs turn out just right.
Quick Guide:
Mr. Make It Happen
Lemon Bae Seasoning

MR. MAKE IT HAPPEN
All-Purpose Seasoning
Step 1: Prepare the Ribs
Remove the Membrane for Extra Tenderness
- Preheat Your Oven: Preheat your oven to 300°F (150°C).
- Prep the Ribs: Lay the ribs bone-side up and use a paper towel for grip to peel off the thin membrane. Removing this helps the meat absorb seasonings better and creates a more tender bite.
Removing the membrane from ribs is an important step for several reasons:
- Tenderness: The membrane, also known as the silver skin, can be tough and chewy. Removing it allows the meat to be more tender and easier to eat.
- Flavor Penetration: Without the membrane, marinades, rubs, and smoke can penetrate the meat more effectively, enhancing the overall flavor of the ribs.
- Better Bark Formation: For those who enjoy a crispy, flavorful crust (or bark) on their ribs, removing the membrane allows for better seasoning adherence and a more appealing texture during cooking.
- Even Cooking: The membrane can create an uneven surface on the ribs, which can lead to inconsistent cooking. Removing it helps ensure that the ribs cook more evenly.

Mr. Make It Happen
Japanese Steel Chef Knife

Season Generously
- Rub ribs evenly with All-Purpose Seasoning and BBQ Seasoning.
- Drizzle liquid smoke over the ribs for an extra layer of smoky goodness.

Why Use A Wire Rack?
Using a wire rack for cooking ribs in the oven offers several benefits:
- Even Cooking: A wire rack elevates the ribs, allowing hot air to circulate around them. This promotes even cooking and helps prevent sogginess, ensuring that the ribs cook uniformly.
- Better Airflow: By elevating the meat, a wire rack allows for better airflow, which can help achieve a crispy exterior. This is especially beneficial if you’re applying a glaze or sauce that you want to caramelize.
- Fat Draining: Ribs can release fat during cooking. Using a wire rack allows this excess fat to drip away, resulting in leaner, less greasy ribs.
- Reduced Steaming: When ribs are placed directly on a baking sheet, they can steam in their own juices, leading to a less desirable texture. A wire rack helps to minimize this effect.
- Easy Handling: A wire rack makes it easier to transfer the ribs in and out of the oven, and it can also simplify basting and glazing.
- Presentation: Cooking ribs on a wire rack can improve presentation. The ribs are less likely to stick or tear when it comes time to serve.
- Basting Convenience: If you’re basting your ribs during cooking, a wire rack allows you to do so without making a mess, as any drips will fall into the pan below.

Step 2: Bake Low & Slow
Bake the ribs for 2.5 hours at 300 degrees. After the 2.5-hour mark, we are going to remove them from the oven and wrap them in foil with some butter, honey, brown sugar, and beef/fruit juice/or chicken broth.
This process helps ensure the ribs get nice and tender.

Shop my favorite kitchen tools & seasonings on my Amazon Storefront →
I originally learned this recipe technique from an old friend of mine who sold me a BBQ Smoker. He was a competition BBQ guy, and his specialty was ribs.
I’ve been making them like this for almost 10 years now, and it really doesn’t get better than this (the smoker is superior to the oven, but everyone doesn’t have access to or the time for that, so here we are!)
Step 3: Wrap & Tenderize

Lay the ribs bone side down and repeat the layering of ingredients.

Finally, add the liquid of your choice. This creates a steamy environment and promotes tenderness.
Wrap the ribs tightly and pop them back in the oven for 90 minutes or until they start to get good and tender.
Step 4: Make the BBQ Sauce
Simmer & Thicken
- In a saucepan, melt butter over medium heat.
- Stir in brown sugar, ketchup, molasses, honey, and chipotles in adobo.
- Simmer for 5-7 minutes until thickened.
- Taste & adjust seasoning with AP Seasoning & liquid smoke.

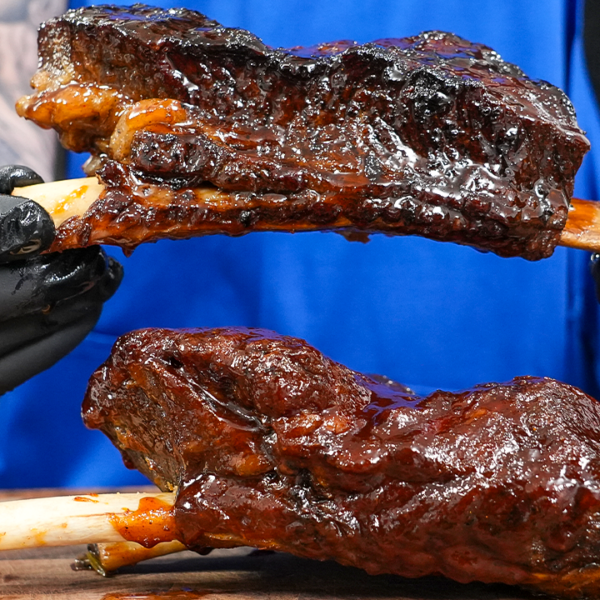
Step 5: Glaze & Caramelize
Final Touch for the Best Ribs
Return to oven at 375°F (190°C) for 15-30 minutes, until the sauce caramelizes beautifully.
Unwrap ribs and generously brush with BBQ sauce.
Remove from the foil and baste in BBQ sauce.

This is how we were looking before the sauce.

Once they’re sauced, add them back to the oven for 15-30 minutes.

Remove from the oven and let the ribs rest for a few minutes before slicing. Serve with additional sauce on the side and enjoy!

Why You'll Love These Oven-Baked BBQ Ribs
- No Grill? No Problem! Enjoy BBQ-style ribs straight from your oven.
- Fall-Off-The-Bone Tenderness thanks to low-and-slow cooking.
- Smoky, Sweet, & Spiced flavors using simple pantry ingredients.
- Perfect for Any Occasion, whether it's a weeknight meal or a party centerpiece.
Step 6: Rest, Slice & Serve
These oven-baked ribs are sure to be a hit at any dinner table. With their tender meat and rich, smoky flavor, they embody the essence of comfort food.
Pair them with your favorite sides—like coleslaw or cornbread—and you’ll have a meal that everyone will love!
If you give this recipe a try, let me know how it turns out in the comments below.
Happy cooking!
What to Serve with Oven-Baked Ribs
Pair these juicy BBQ ribs with:
- Creamy Coleslaw for a refreshing crunch
- Honey Butter Cornbread for a sweet-savory bite
- Baked Mac & Cheese for the ultimate comfort food combo
Print & Download Oven Baked BBQ Ribs
Frequently Asked Questions
How long does it take to cook ribs in the oven?
Plan for about 3 to 3.5 hours total. The ribs bake uncovered at 275°F for the first phase, then get wrapped in foil for another hour to tenderize, followed by a final glaze under the broiler. Low and slow is the key to fall-off-the-bone texture every single time.
Do you need to remove the membrane from ribs before baking?
Yes, always remove the thin membrane on the back of the ribs before cooking. It prevents your seasoning from penetrating the meat and turns rubbery when cooked. Grab a corner with a paper towel for grip and peel it off in one smooth motion.
Can you make oven-baked ribs without BBQ sauce?
Definitely. A good dry rub on its own will give you incredible flavor. Season generously with your favorite spice blend, wrap the ribs in foil during the baking process, and let the natural juices do the work. You can always serve sauce on the side for dipping instead.
What temperature should ribs be when they are done?
Ribs are done when the internal temperature reaches 195°F to 203°F. At this range the collagen has fully broken down and the meat will be tender enough to pull away from the bone cleanly. Use an instant-read thermometer inserted between the bones for the most accurate reading.
Also worth bookmarking: my Asian Sticky Ribs.
Love this recipe? You'll love my seasonings even more!
Level up your cooking with my signature AP Seasoning, Cajun Seasoning, and more.
Shop My Seasonings
Oven Baked BBQ Ribs
Equipment
Ingredients
For the Ribs:
- 1 slab baby back or spare ribs
- All-Purpose Seasoning and BBQ Seasoning to taste
- 1-2 tablespoon liquid smoke for that smoky flavor
- 1 stick of butter
- ¼ cup honey
- ¼ cup brown sugar
- ¼ cup fruit juice beer, or broth (your choice)
For the Sauce:
- 2 tablespoon butter
- ½ cup brown sugar
- 1 cup ketchup
- ¼ - ½ cup molasses depending on your sweetness preference
- ¼ cup honey
- 1 can chipotles in adobo adjust for heat level
- AP Seasoning to taste
- 1 dash liquid smoke
Instructions
Step 1: Prepare the Ribs
- Remove the Membrane for Extra Tenderness
- Lay the ribs bone-side up and use a paper towel for grip to peel off the thin membrane. Removing this helps the meat absorb seasonings better and creates a more tender bite.
- Season Generously
- Rub ribs evenly with AP Seasoning and Lemon Bae Seasoning.
- Drizzle liquid smoke over the ribs for an extra layer of smoky goodness.
Step 2: Bake Low & Slow
- Set Up for Success
- Place a wire rack on a baking sheet—this ensures even cooking and prevents steaming.
- Lay the ribs meat-side up and bake for 2.5 hours uncovered.
Step 3: Wrap & Tenderize
- Remove ribs from oven and wrap tightly in foil with butter, honey, brown sugar, and liquid (juice, beer, or broth).
- Return to oven and bake for 90 minutes, letting the ribs steam in flavor.
Step 4: Make the BBQ Sauce
- In a saucepan, melt butter over medium heat.
- Stir in brown sugar, ketchup, molasses, honey, and chipotles in adobo.
- Simmer for 5-7 minutes until thickened.
- Taste & adjust seasoning with AP Seasoning & liquid smoke.
Step 5: Glaze & Caramelize
- Unwrap ribs and generously brush with BBQ sauce.
- Return to oven at 375°F (190°C) for 15-30 minutes, until the sauce caramelizes beautifully.
Step 6: Rest, Slice & Serve
- Let ribs rest 5-10 minutes before slicing.
- Serve with extra BBQ sauce and your favorite sides!
Notes
Expert Tips for Perfect BBQ Ribs
- Use a Wire Rack to prevent steaming and promote even cooking.
- Wrap Tightly in Foil to trap moisture and enhance tenderness.
- Let Ribs Rest before slicing to keep juices locked in.
- Adjust Heat Level by adding/removing chipotle peppers.
Nutrition
Equipment & Tools Used In This Recipe
As an Amazon Associate I earn from qualifying purchases.
Good afternoon
Just saw you on the Tamera Hall show. So proud to see a local person. I live on the Northern Neck of Va (Lively Va) sure you have not heard of it 😊
Just wanted to reach out and wish you continued success. I can’t wait to eat at your restaurant and also try your recipes.
This is my first time making ribs for my husband and I was a little scared I would mess them up. He loved them!!! Thank you so much for this recipe!
Thank you so much for sharing this recipe! Wow, is this fabulous and the barbecue sauce is wonderful so there's no longer a need to buy store bought!!! I really appreciate you sharing this recipe. It's a keeper and we'll be making this many more times! Thank you!!!
Nice, to cold outside today for the smoker so seen your recipe for the oven and I am doing it now thanks
I just want to say, until this recipe, I’ve tried and failed to make tender ribs SO many times. I hate broiling and creating smoke in the house and I don’t have a smoker. This recipe is the perfect oven baked ribs that are fall off the bone and not dried out. Thank you for sharing the technique you got from the bbq master. I am forever grateful!
I love ribs but not in the oven. I tried this recipe last night and WOW! They where great!!! My husband thought I put them on the grill. When the weather permits Me from outside grilling, this will be my go to recipe from now on. Thanks for sharing it.
Thank you!! I'm glad to be added to the books!
I really like this ribs recipe, It was delicios, I made it for Thanksgiving dinner. Thank you for sharing. God bless you!!!
I love your recipes. Thank you for offering them greatly appreciate it.